Creating a new reversing emulator
Edit on Github | Updated: 13th May 2020Step by step guide for how to create a Reversing emulator for your console of choice.
Note that you may not need this guide if someone has already created a Reversing emulator for your console.
Step 1 - Initial Repository Setup
Fork an emulator for your console
Since the libRetroReversing library is based on libRetro it is easier to find an existing libRetro based emulator and fork it as the basis of your new project.
You can find the emulators here: libretro Emulator Repositories
Find the repository most suited for your project, as there can be multiple emulators for your target console, do some research to find out which one you personally prefer.
In this example we chose the Sega Saturn emulator from libretro and clicked fork, resulting in our own forked version of the repository here: https://github.com/RetroReversing/yabause
Add LibRetroReversing as a submodule
First checkout your newly forked repository to your local machine and then open a new terminal in the root of the repository.
Now run the following command:
git submodule add https://github.com/RetroReversing/libRetroReversing.git
This should run and when finished you will see a new folder called libRetroReversing in that root directory.
Now to make sure it is correct lets run git status like so:
git status
The output should look something like this:
On branch master
Your branch is up to date with 'origin/master'.

Changes to be committed:
  (use "git restore --staged <file>..." to unstage)
	new file:   ../.gitmodules
	new file:   ../libRetroReversing
Commit the initial changes
Run the following in the same terminal you have been using previously:
git commit -m "First step in creating a Reversing emulator"
Push the changes to github
That should create your first commit and now to make sure you don’t loose your precious work lets push back to github:
git push origin master
Step 2 - Building the Emulator
This is where it will get a little bit different depending on the emulator (libretro core) you are trying to build.
2.1 Find the Makefile
You need to look for a file called Makefile.libretro OR one simply called Makefile, the letter case doesn’t matter.
If you can’t find it but you have a file called CMakeLists.txt then you have an extra step before going to step 2.2.
2.1a Generate the Makefile with CMake
This step is only required if you don’t have a Makefile already generated.
You need to go to the directory of your CMakeLists.txt file in your terminal and run the following command:
cmake .
After this has succeeded then you should get a “Makefile” file generated. If you don’t then please ask in the comments below and we should be able to help.
2.2 Running the Makefile
Before making changes to the Makefile its important that we can successfully run it.
So now that you are in the folder with the Makefile you simply need to run:
make
2.2a Missing Files
The problem with some of the libretro cores is that they sometimes reference system files that you don’t have, so when running make you may encounter issues such as:
#include <SDL2/SDL.h>
Depending on your system you may have to install SDL2 from a package manager, e.g on Macos:
brew install SDL2
In my case I already had it installed but it still wasn’t finding it so I got the path to the file using the locate command like so:
locate SDL.h
It came up with a few paths including the one I want to use /usr/local/Cellar/sdl2/2.0.9_1/include/SDL2/SDL.h.
So I added the following to my environment:
export C_INCLUDE_PATH=/usr/local/Cellar/sdl2/2.0.9_1/include/
Step 3 - Running the Emulator
Now that you have successfully compiled the library into a binary (with an extension such as .dylib, .dll or .so), you are ready to run it!
Try running from command line
You can run the library you built through the terminal like so:
/Applications/RetroArch.app/Contents/MacOS/RetroArch -L mednafen_saturn_libretro.dylib "/Saturn/Games/Awesome Game.cue" -v
Note that for consoles that require a BIOS make sure it is located in the System directory of RetroArch. Mine was ~/Documents/RetroArch/system.
Step 4 - Modifying the Makefile to include libRetroReversing
4.1 Add include to Makefile
Find the main Makefile for your core, for example it may be called Makefile.libretro.
Find the line that imports the common makefile:
include $(BUILD_DIR)/Makefile.common
Add the following line after it, chaning ConsoleName to the name of the console (you will need this name later):
libRetroReversingConsole = ConsoleName
include ./libRetroReversing/Makefile.retroreversing
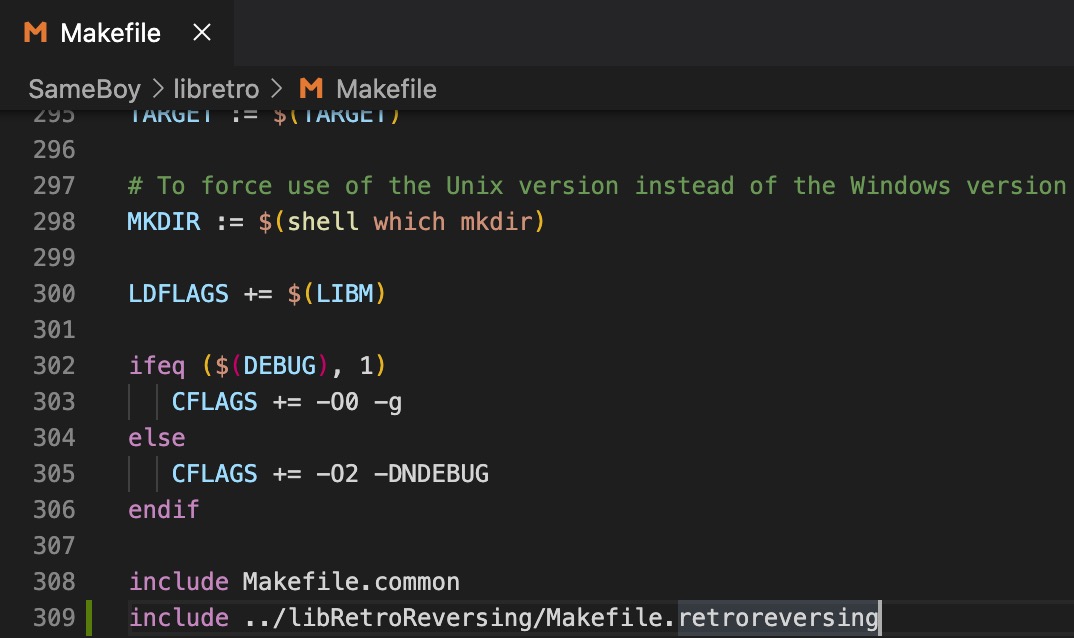
For example in the emulator SameBoy the Makefile for libretro is in its own libretro folder as you can see in the screenshot below:
4.2 Re-make
Now that you have included the libRetroReversing source files, re-run make the same way you did earlier and then make sure the emulator still works, you can do all this with the one liner below.
make && /Applications/RetroArch.app/Contents/MacOS/RetroArch -L mednafen_saturn_libretro.dylib "/Saturn/Games/Awesome Game.cue" -v
Add specific functions for your console
In the libRetroReversing submodule duplicate a file called ./console/DummyConsole.cpp and name it after your console e.g Saturn.cpp. This needs to match the ConsoleName exactly as you defined it earlier in step 4.1.
This file will be the main interface that will hold the custom code for your specific emulator.
There are a couple of functions you will need to implement:
Step 5 - Source Modifications
5.1 Add Include to top of libretro.c
Find either libretro.c or libretro.cpp and add the following include to the top of the file:
#include "libRetroReversing/include/libRR.h"
5.2 Add Logging of Input
Finding where to put this function call is tricky as it depends where input is handled in the core you are modifying, but try to find a function that uses retro_input_state_t and add the following call, which will modify the input based on if we are in playback mode or recording mode
//libRR start
  retro_input_state_t input_cb = libRR_handle_input(original_input_state_cb);
  // libRR end
5.2.1 Add Input Descriptors
Find code like the following:
environ_cb( RETRO_ENVIRONMENT_SET_INPUT_DESCRIPTORS, desc );
And add the following code under it, note that whatever was in the second parameter slot (desc in thsi case) should be passed as the first parameter:
libRR_setInputDescriptor(desc, 21);
5.3 Allow libRR to pause the game
Find the retro_run function and add the following code to the top of it:
// libRR start
    bool should_continue = libRR_run_frame();
    if (!should_continue)
    {
        return;
    }
    // libRR end
5.4 Override the Video Callback function
Find any calls to the function video_cb and replace them with calls to libRR_video_cb.
5.5 Hook into retro_load_game
Find the definition of the retro_load_game function and add code like the following:
// libRR start
libRR_handle_load_game(info, environ_cb);
// libRR end